Planing your Route
Preparation / Creation of your Route
All is starting with an appropriate planing of your trip - you might like to use
an already existing route or you are going to create a complete new one - in both cases I recommend
to create an additional navigation path for GPSLogger.
Why an additional Navigation Path?!
For the extended outdoor navigation features of GPSLogger (waypoint ahead
notification & Display ON near waypoint it is recommended to have "special marked"
points in your tour that indicate a junction or turn - these points in the path are very important
and need your attention while you are on tour.
In an ideal world these special points would be simply marked inside the regular
path - but right now I haven't found tools that would support this special marking so I have decided
to use a second path (since GPSLogger is supporting multiple loaded parts since a long time).
The Background Path
Personally I prefer the track editor of
gpsies.com to create/edit path and download them
directly via
GPSiesConnect to my BlackBerry but
there are for sure plenty of other alternatives around that would allow you to create GPX or KML
files that then can be imported into GPSLogger.
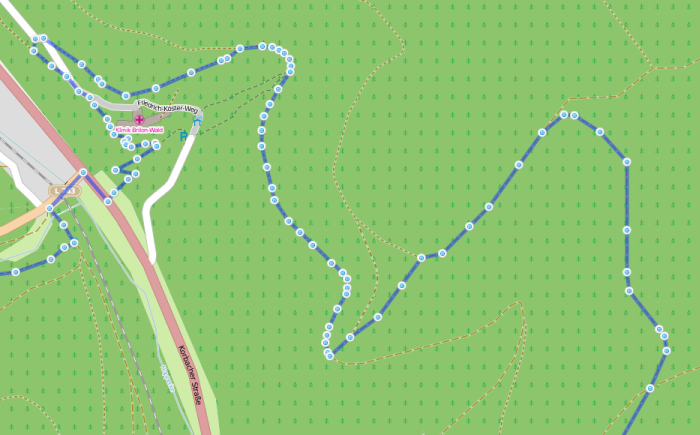
[Background Path (in gpsies.com track editor)]
So first you going to create the default path - This path should be the plotted
line that is following the streets and tracks. This path will be later loaded as so called
Background Path into GPSLogger and will be rendered semi transparent.
The only purpose of this path is to be displayed inside GPSLogger - it
does not have any other function - it is just for your visual reference.
It takes a while to draw your complete path but I recommend to to it as accurate
as possible. During this procedure you might already get the important points of your planed trip
into your head - that can be very helpful in an case of emergency! Please do not have blind
faith in your BlackBerry and GPSLogger - still use your brain - it can do amazing things!
The Navigation Path
While the Background Path is just for your visual reference the Navigation Path
is (of course) the base of the outdoor navigation functionality of GPSLogger. So everything depends
from this path and it's accuracy!
Allow me to describe again in some short words how the outdoor navigation in
working in GPSLogger:
- When you are loading a Navigation path into GPSLogger, the application is finding the point in
the loaded path that have the smallest distance to your current location and takes this point as
initial direction point.
- GPSLogger is now pointing into the direction of this point (but does not take any natural barriers
into account) - also GPSLogger is showing you the distance to this point.
- Now you (should) approving this point and hopefully you will reach it.
- In the GPSLogger options you can define the minimal distance to a waypoint. Once you have reached
this distance GPSLogger is tring to find the "next" waypoint in your navigation path
- The "next" waypoint will be the point in the path that have at least the defined "next waypoint
distance". to your current location.
- This "next" waypoint will become your current direction point and GPSLogger will show you again
the course and the distance to this point.
Having this functionality in mind the creation of the navigation path should follow
some simple rules. Below you are seeing the same section of the previously shown background path -
you will instantly spot the differences.
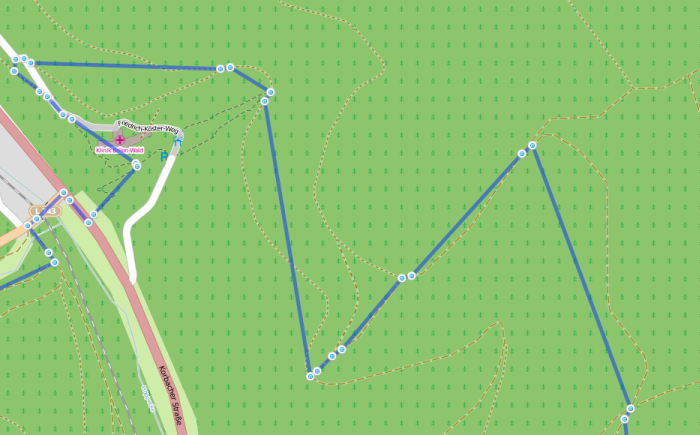
[Navigation Path (in gpsies.com track editor)]
First (and most important) of all the navigation path should only contain points
that are marking a junction (or other important points on your trip). Having in mind that GPSLogger
is able to trigger a notification and/or automatically enable the backlight of your device once
your are approaching a navigation point - that's why you should really use them when you actually
need such a notification (all to save battery life).
When you would have only the junctions in your navigation path, then the
arrow (to the next navi-path-point) which GPSLogger is going to display might be quite confusing
since it might point into a direction where NONE of the tracks ahead is going to.
That's why I suggest to add after each junction marking nav-point an additional
wayoint that will allow the device to point into the apropriate direction once the junction
nav-point is reached.
With the right setting of the "Distance to next Waypoint" this will give you
quite a comfortable outdoor navigation functionality.
Comparison Background vs. Navigation Path
Below you will see (again) a comparison between the a background and a navigation
path of the same track. If you like to can get more details of both track versions directly at the
gpsies.com website:
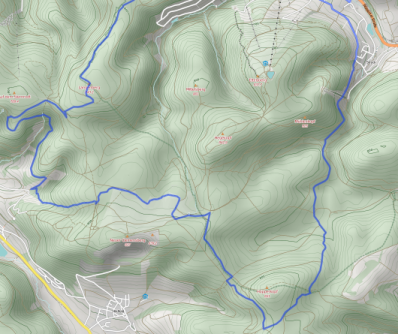
[Background Path]

[Navigation Path]
